
WordPress is thought for being probably the most well-liked content material administration system (CMS) software program choices obtainable up to now. One of many most important causes for that is that WordPress is straightforward to make use of and meets the wants of virtually any kind of web site and enterprise.

![Download Now: How to Launch a WordPress Website [Free Guide + Checklist]](https://no-cache.hubspot.com/cta/default/53/b5ae83fa-3a09-487e-a43a-4833bf87ab87.png)
Putting in the CMS is a straightforward course of that solely takes about 5 minutes. However if you happen to’re new to the software program, putting in WordPress could seem daunting.
That’s why we’ve created this information to take you thru the set up course of step-by-step so you’ll be able to shortly get your web site up and working. See 4 widespread WordPress set up strategies beneath.
Methods to Set up WordPress in 5 Minutes
- Underneath the auto-installer part in your cPanel, click on on the WordPress icon.
- You can be redirected to a web page the place you’ll be able to click on “Set up Now”
- Underneath “Protocol”, the default is “http”. We advocate you stick to this until you may have put in an SSL certificates — during which case, it’s best to use “https.”
- The very last thing you’ll have to do is full your admin web page data.
3 Steps to Put together You to Set up WordPress
Earlier than you get began with the set up course of, you’ll have to sort out these three easy duties. These steps will assist pace up the set up course of and guarantee you might be fully able to go.
1. Acquire net server entry.
You’ll have to be sure you have net server entry earlier than putting in WordPress. Internet servers are software program devoted to internet hosting, or “serving,” web sites. Internet servers retailer, course of, and ship your net pages to these looking for your website on-line.
Some of the well-liked net server software program choices is Apache. It’s attainable to create your personal net server to put in WordPress on; nevertheless, it’s extra widespread for customers to buy a internet hosting supplier that runs on an internet server, corresponding to Bluehost or SiteGround.
If you’re utilizing a internet hosting supplier, you’ll want to ensure it meets WordPress’ three necessities earlier than set up. These necessities embrace:
- PHP model 7.2 or better.
- MySQL model 5.6 or better OR MariaDB model 10.0 or better.
- HTTPS help.
2. Acquire an FTP shopper.
FTP, or file switch protocol, is the tactic by which you’ll add, obtain, and handle your WordPress information in your server. In the event you select a internet hosting supplier, this needs to be taken care of for you.
3. Obtain the newest model of WordPress.
You’ll be able to at all times be sure you have the newest model of WordPress by visiting their web site and downloading their most up-to-date replace.
Now, let’s assessment your WordPress set up choices.
Methods to Set up WordPress
WordPress retains set up easy. Irrespective of which methodology you select, the method ought to solely take about 5 minutes. We are going to focus on the 4 WordPress set up choices beneath and who they’re most useful for.
We advocate the only possibility — discovering a internet hosting supplier that gives computerized WordPress set up. Nevertheless it’s as much as you.
See the 4 strategies beneath.
1. Select a internet hosting supplier with computerized WordPress set up.
There are a number of web site internet hosting suppliers that provide computerized WordPress set up, corresponding to Bluehost, WP Engine, or Dreamhost, making this the simplest set up methodology. It is a nice possibility if you happen to’re new to WordPress or don’t have a background in net improvement.
In the event you’re uncertain whether or not or not your supplier gives computerized WordPress set up, try their web site. That data is usually listed on their help web page.
2. Set up WordPress in your pc.
You’ll be able to set up WordPress immediately in your pc. This methodology is rare as a result of, though you’ll have a fully-functioning web site, WordPress will solely be accessible regionally.
This methodology is barely helpful if you happen to’re simply seeking to mess around with the CMS by yourself and don’t need a web site that others can entry.
Right here’s how one can set up WordPress in your Home windows:
Step 1. Obtain WAMP
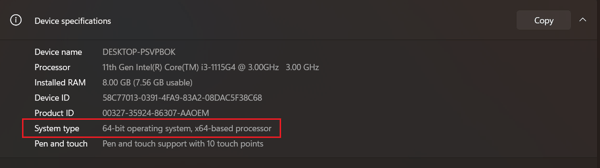
You’ll should obtain one of the best model on your pc in accordance with its OS kind. To search out your working system, head over to Management Panel > System and Safety > System after which search for the System Kind part.
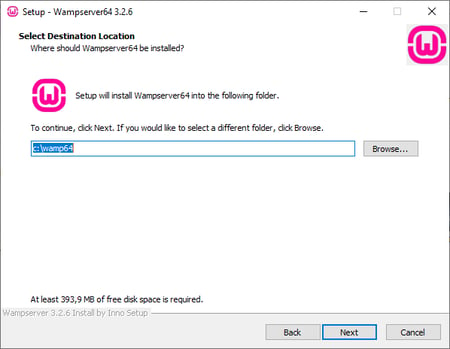
Step 2. Set up the WampServer
When you obtain the file, open the saved folder. Then observe the set up directions and set a vacation spot to put in WampServer.
Step 3. Launch phpMyAdmin and Log In
As soon as the set up is full, launch this system from the Begin menu. Make sure the icon is inexperienced. This implies the whole lot is functioning accurately. Nonetheless, if you happen to spot a yellow or purple icon, you should resolve the issue by restarting this system.
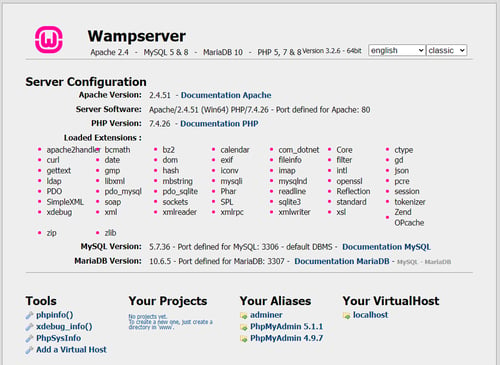
Click on on phpMyAdmin, to handle the MySQL database. You’ll be able to entry the phpMyAdmin display by your browser by typing in localhost. It should open the WampServer configuration web page.
Subsequent, click on on “Go” to entry the dashboard.
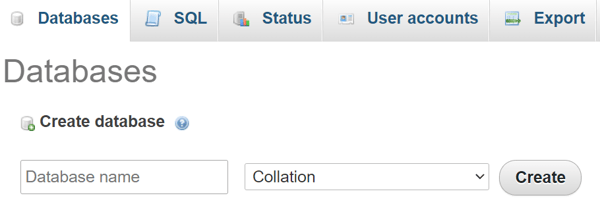
Step 4. Create a Database and Set up WordPress
From the tabs on the high of the web page select Databases. Create a brand new database on your WordPress web site, enter a reputation and select Collation within the drop-down menu.
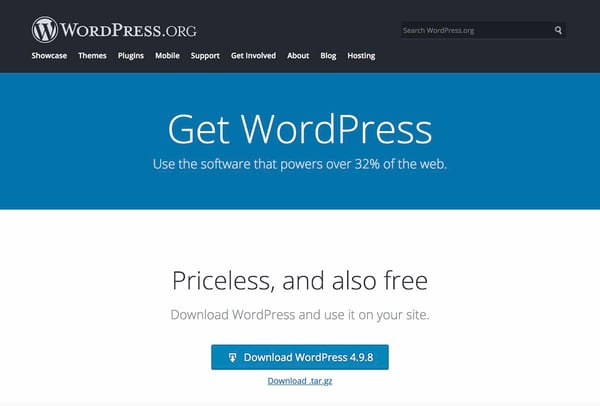
Step 5. Obtain the platform
Go to WordPress.org and choose Get WordPress. Extract the ZIP file and replica it. Then discover the folder the place you put in WAMP and paste the WordPress folder into its root listing.
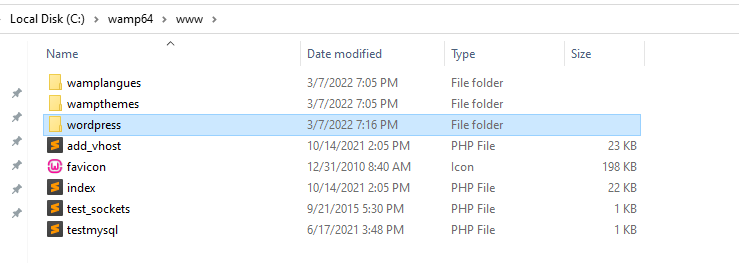
Rename the WordPress folder to something you need. Keep in mind this can develop into the URL and title of your native WordPress website, you should maintain it descriptive and clear.
Step 6. Go to your website
End putting in a WampServer WordPress, open your browser, and go to http://localhost/mytestingsite. Change “mytestingsite” with the title you selected.
To start establishing your WordPress, you’ll have to decide on a language. Whereas including your particulars, use ‘root’ because the username and go away the password house clean.
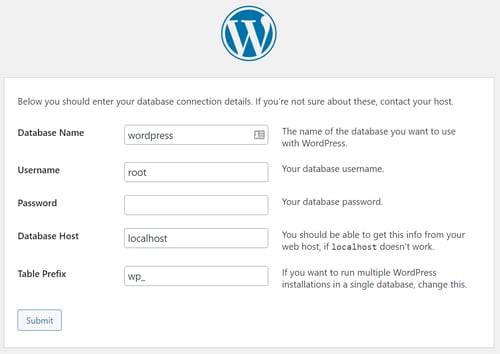
Now WordPress will connect with your database. You’ll be able to proceed to run the set up course of. Enter the positioning’s username, title, e mail tackle, and password on your WordPress account everytime you spot a welcome display.
Then click on “Log In” to entry the native website’s WordPress dashboard. After that, you’ll be able to conduct any check or troubleshooting you need.
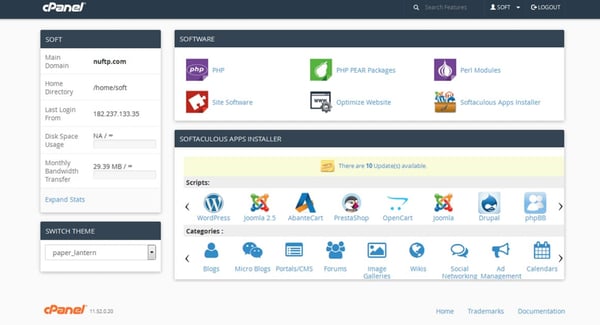
3. Use the cPanel and auto-installers.
Putting in WordPress by the cPanel is an effective possibility in order for you a bit extra of a hands-on expertise. That is extra widespread for net builders or folks with a technical background who wish to tailor the set up course of.
The cPanel is a dashboard that many internet hosting suppliers provide you with entry to upon signing up. When you log in to your panel with the credentials offered by your host, it’s best to see a piece in your cPanel referred to as “auto-installers”.
Be aware: not all cPanels look the identical, however the WordPress set up course of is identical. So in case your panel seems someway totally different from this, don’t fear you’ll nonetheless be capable of observe alongside.
Step 1. Underneath the auto-installer part in your cPanel, click on on the WordPress icon.
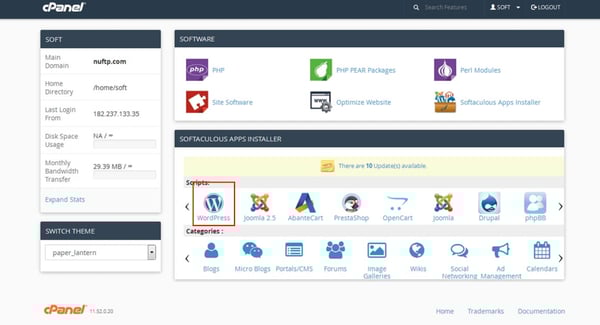
Step 2. You can be redirected to a web page the place you’ll be able to click on “Set up Now.” After you have clicked that button, you can be requested to enter the area title the place you wish to set up WordPress. It doesn’t matter what cPanel or auto-installer you might be utilizing, this web page ought to look related.
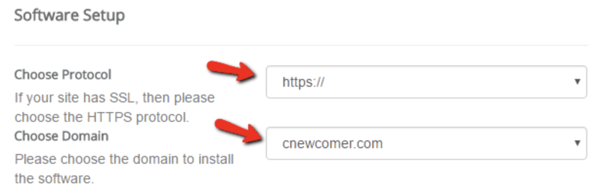
Step 3. Underneath “Protocol,” the default is “http.” We advocate you stick to this until you may have put in an SSL certificates – during which it’s best to use “https.”
You’ll even be requested if you wish to enter a “Listing.” Most often, you’ll wish to go away this clean to make sure WordPress is put in in your most important area.
In the event you go away the sphere clean, your URL will appear like this: www.mysite.com. In the event you enter a listing, your URL will appear like this: www.mysite.com/weblog, which means WordPress will solely be put in on a portion of your website.
You may as well enter the title of your web site (learn: enterprise title) and outline (learn: goal of your web site) underneath “Web site Settings.” If you wish to change these later, you’ll be able to at all times return in and replace them.

Step 4. The very last thing you’ll have to do is full your admin web page data. Enter your admin username, password, e mail tackle, and anything required — there could also be just a few extra questions to finish based mostly on the auto-installer you selected. Then, click on “Set up.”
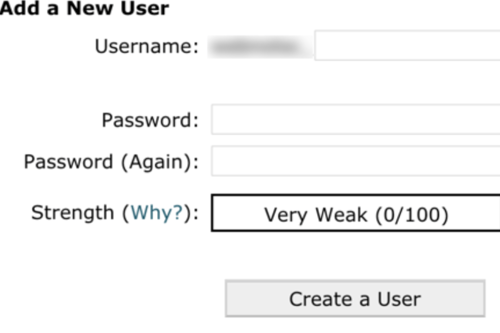
It’s best to now be capable of entry the backend of your website on WordPress at www.mysite.com/wp-admin. That is additionally the place you’ll be able to edit your admin particulars if wanted.
4. Manually Set up With FTP
Between the variety of web site internet hosting suppliers that mechanically set up WordPress for you, in addition to the auto-installers obtainable in your cPanel, there isn’t actually a have to manually set up the software program with an FTP. Nonetheless, if you happen to do select this set up route, you’ll be able to observe the steps beneath.
Step 1. You’ll want an FTP program corresponding to SmartFTP or FileZilla (as talked about within the 5 duties you should full previous to starting set up).
Subsequent, head to the WordPress web site and obtain the newest model of the CMS.
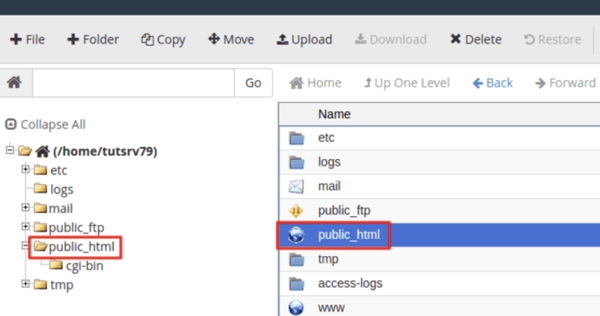
Step 2. Then unzip the WordPress file and add it to your public listing, which ought to look one thing like this: public_html.
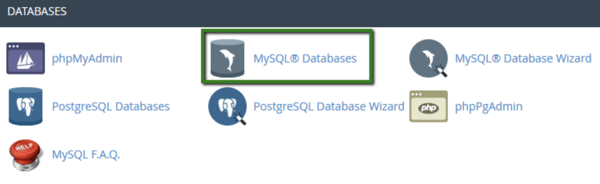
Step 3. Go to your cPanel and discover the “MySQL Databases” button. All cPanels ought to have an identical look, though your MySQL button could also be positioned in a barely totally different location.
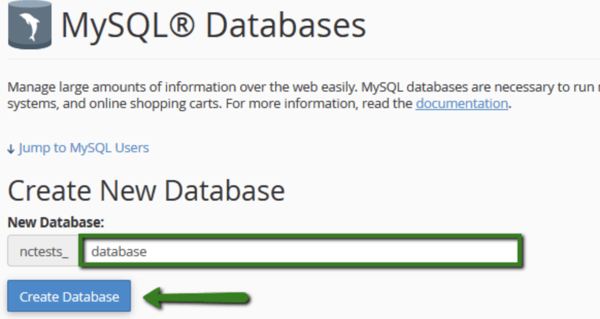
Observe the immediate that asks you to enter your database title. After you have finished that, click on “Create Database.”
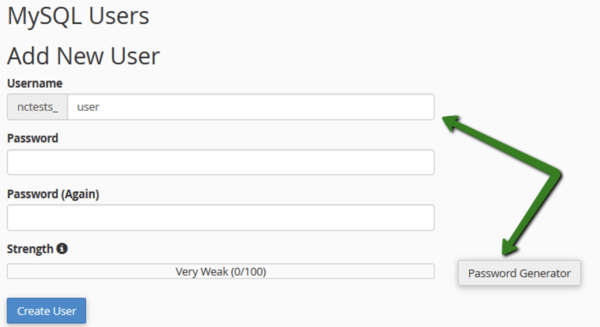
Step 4. Now that the database has been created, you’ll be requested to create a “person” on your MySQL account. Full your username and password and click on “Create Person”.
Give that person entry to your database by including their data in addition to the title of the database you’re including them to.

Step 5. On the next web page, you’ll be requested concerning the privileges you wish to present that person — ensure they’re all checked.

By now your FTP switch needs to be full and it’s time to go to your area to finish the set up. If the switch was profitable, WordPress will immediate you to decide on your language if you go to your area.
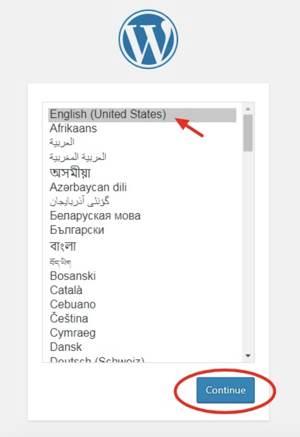
Step 6. Choose your required language and click on “Proceed.”
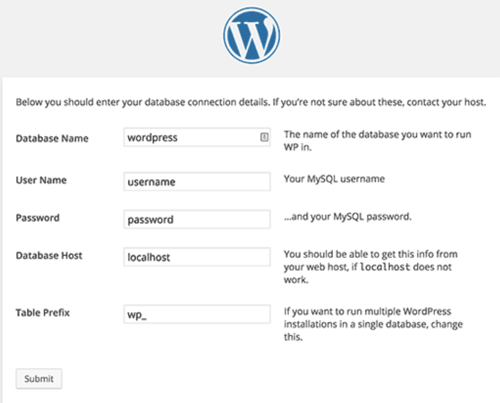
Step 7. You’ll then be requested to enter your Database “Identify,” “Username,” “Password,” “Database Host,” and “Desk Prefix.”
When you’ve accomplished these fields, click on “Submit.”
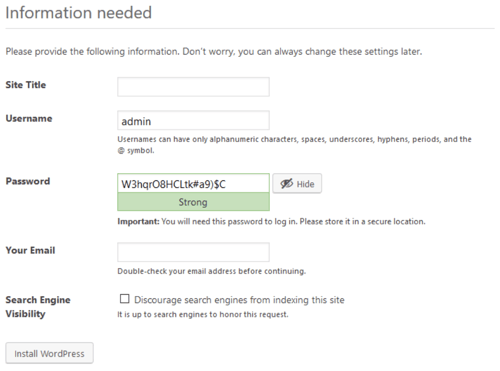
Step 8. Click on the button that claims “Run the Set up.” You’ll be requested to offer WordPress your admin data. It will embrace your “Web site Title,” “Username,” “Password,” and “E mail,” that you simply created beforehand.
Step 9. Lastly, click on “Set up WordPress.” It’s best to now be capable of log into WordPress together with your username and password.
Congrats! You’ve manually put in WordPress.
Ultimate Ideas on WordPress Set up
In the event you’re in a position to decide on a internet hosting supplier that meets your wants, WordPress set up shall be simple and computerized — this feature is very really useful for anybody fully new to WordPress, or web site creation usually.
Nonetheless, do you have to select to put in WordPress your self, your choices are nonetheless easy and simple to observe.
In the event you need assistance at any level through the set up course of, try the WordPress FAQ or troubleshooting pages.
Irrespective of your background, the WordPress set up course of is fast and simple, permitting you extra time to concentrate on the issues that matter, corresponding to customizing your web site and creating an ideal person expertise on your guests.
Editor’s Be aware: This publish was initially revealed in Nov. 2018 and has been up to date for comprehensiveness.