

Would you like a WooCommerce login web page to enhance your customers’ expertise and scale back procuring cart abandonment?
With a WooCommerce popup, you may assist customers seamlessly log in to their accounts inside your eCommerce retailer.
That’s why, immediately, we’ll present you the right way to create a login popup in your on-line retailer. For this tutorial, we’ll be utilizing 2 highly effective instruments:
By combining WPForms with OptinMonster, you’ll be capable of create a extremely changing login type in a matter of minutes.
In addition to the two instruments, we’ll additionally stroll you thru steps to create login popup pages for 3 eventualities which are widespread throughout many eCommerce web sites.
However first, let’s have a look at what a login popup is and why you want it within the first place.
What Is a WooCommerce Login Web page?
A WooCommerce login web page is a login type that requires customers to enter a username (or e mail deal with) and password to entry sure content material in your WooCommerce web site.
A WooCommerce login web page helps you authenticate consumer credentials and guarantee web site safety. Together with a login popup in your web site permits solely registered customers to entry particular options or pages in your WooCommerce retailer.
Making a WooCommerce login popup additionally means that you can immediate personalised campaigns to your customers based mostly on their login information, similar to their title, date of beginning, gender, buy historical past, location, and different demographic particulars.
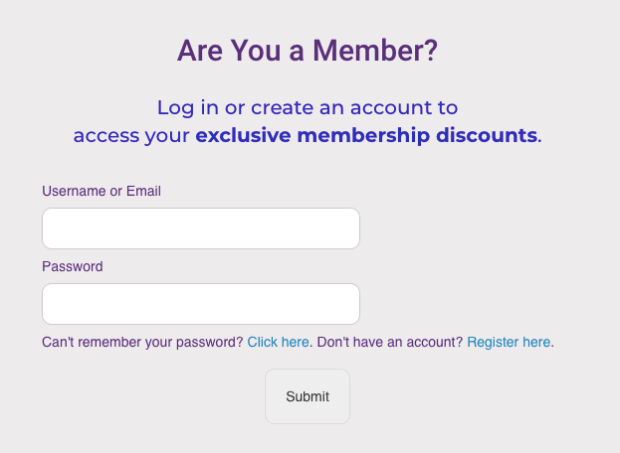
Right here’s a fast have a look at the login popup type we’ll construct immediately:
Why Do You Want a WooCommerce Login Web page?
There are a number of use instances for WooCommerce shops to make use of a login popup type:
- Making a clickable login button that triggers a popup for purchasers to sign up to their account.
- Making prospects enroll together with your retailer or log in to their account to finish a checkout.
- Asking prospects to enroll or log in to your web site as quickly as they land in your web site.
- Making particular product pages or unique content material accessible solely to registered customers.
- Making your complete WooCommerce web site accessible solely to registered customers.
- Letting customers log in to their private account pages to entry data associated to rewards factors, cargo monitoring, or order historical past.
Let’s look extra intently on the first 3 of those use instances. These are eventualities that the majority eCommerce shops provide to their customers.
1. Making a Clickable Login Button
With a clickable login choice within the navigational menu, customers can log in at any time with out being redirected to a brand new web page. They will merely click on Log in or Check in via your customized login popup and key of their credentials to entry their consumer account.
2. Making Prospects Enroll or Log in to Full a Checkout
Most WooCommerce shops enable everybody visiting their eCommerce web site to take a look at their merchandise. These shops even have popups to entice patrons with particular presents or have stellar copywriting that makes them wish to purchase from the shop.
However when it’s time for these patrons to buy a product, some WooCommerce shops require customers to log in to their account to finish a checkout.
If you would like customers to log in earlier than they will checkout, you may create a customized login popup that prompts patrons to sign up together with your web site.
3. Asking Prospects to Enroll or Log in as Quickly as They Land on the Web site
You may also show a popup to returning members as quickly as they land in your WooCommerce web site. This helps them entry their account particulars, billing historical past, and delivery data earlier than checkout.
It means that you can improve your web site sign-ups or present personalised campaigns to patrons based mostly on their buy historical past or consumer habits. As an example, you may ship them reminders about unpurchased objects left of their procuring carts to scale back cart abandonment.
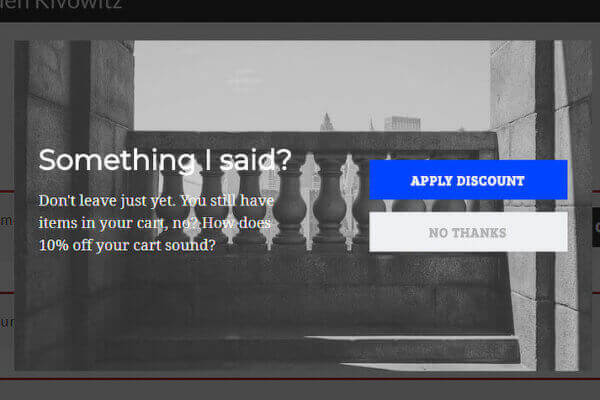
Right here’s an instance from Scott Wyden Kivowitz’s web site. Scott used OptinMonster to construct the exit intent popup proven beneath and recovered 21% of deserted carts:
Or, you may automate follow-up emails to prospects recommending them merchandise much like those they purchased previously.
Associated Content material: Are you getting essentially the most income out of your e mail campaigns? If not, discover ways to grasp e mail advertising with this in-depth useful resource: E mail Advertising Made Easy: A Step-by-Step Information.
The way in which you employ your WooCommerce buyer login web page is dependent upon your wants and advertising technique. Earlier than we cowl the particular use instances, let’s go over the two instruments that we’ll use to create the customized login web page.
The way to Create a WooCommerce Login Web page
Each the instruments we’ll use immediately are simple to make use of and nice for producing leads.
- WPForms: The perfect type builder on WordPress that helps you create customized kinds with only a drag and a drop. It’s utilized by 6,000,000+ enterprise homeowners and comes with over 100 type templates to save lots of you time.
- OptinMonster: The world’s #1 conversion optimization software program that offers you all of the instruments you’ll want to improve your conversion charges. OptinMonster is one of the best software program that can assist you drive visitors, enhance conversions, and get extra gross sales.
Do not Have These Instruments But?: Get began with each WPForms and OptinMonster risk-free! Click on right here to join WPForms and click on right here to be part of OptinMonster immediately!
Step 1: Create a Person Login Type with WPForms
First, you’ll want to set up and activate the WPForms plugin.

WPForms is among the hottest type widgets for WordPress websites. It enables you to create any sort of WordPress type, together with a default WooCommerce login type, WooCommerce registration web page, fee type, and get in touch with type.
If you happen to’ve by no means put in a WordPress plugin earlier than otherwise you’re undecided how, no worries. Take a look at this newbie’s information on the right way to set up a WordPress plugin for a step-by-step tutorial.
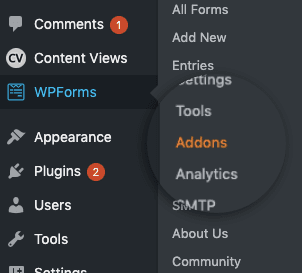
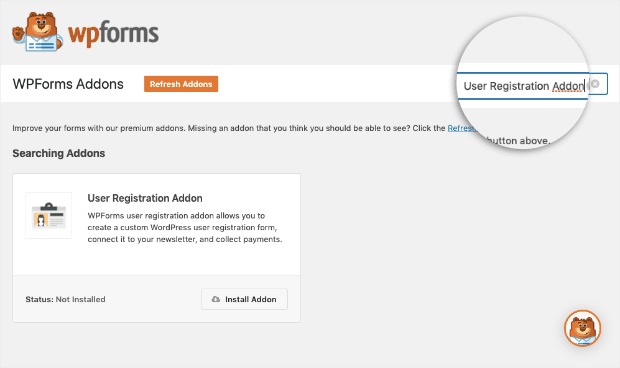
Subsequent, hover over WPForms in your WordPress dashboard menu, and choose Addons from the sub-menu:
Use the search bar in your Addons web page to seek for and activate the Person Registration Addon:
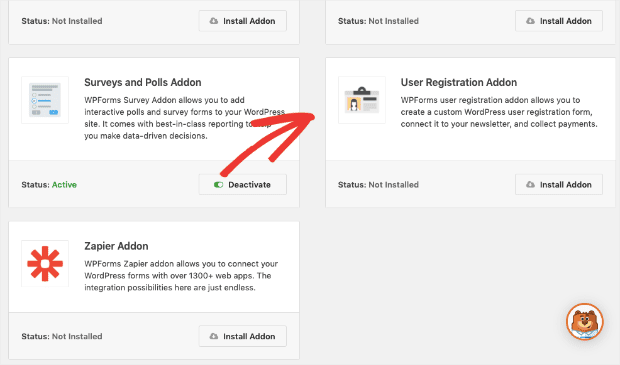
Alternatively, it’s also possible to scroll down via the addon choices to find the Person Registration Addon:
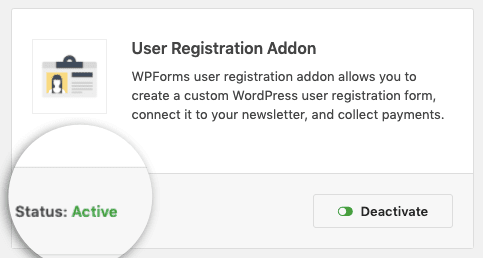
Click on Set up Addon:

As soon as put in, your Person Registration Addon will routinely be activated. You’ll see the standing set to Lively within the lower-left nook of the addon field:
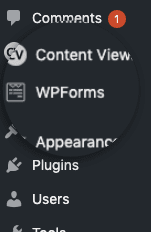
Return to the left-hand aspect menu of your WordPress dashboard and click on on WPForms:
Create a brand new type by clicking Add New:

Seek for the pre-built Person Login Type template to get began:
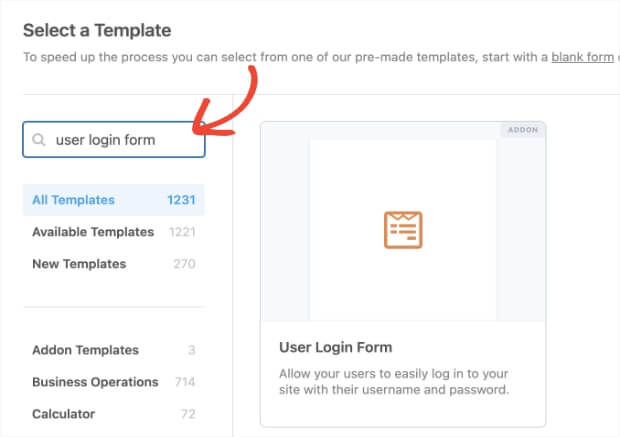
Click on Use Template:

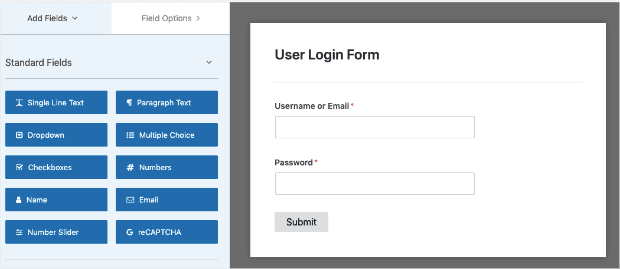
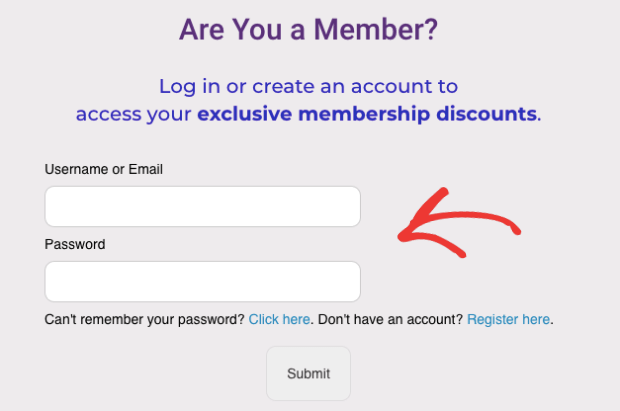
The default template will ask for a consumer’s title or e mail deal with and password. Usually, the default template might be precisely what you want:
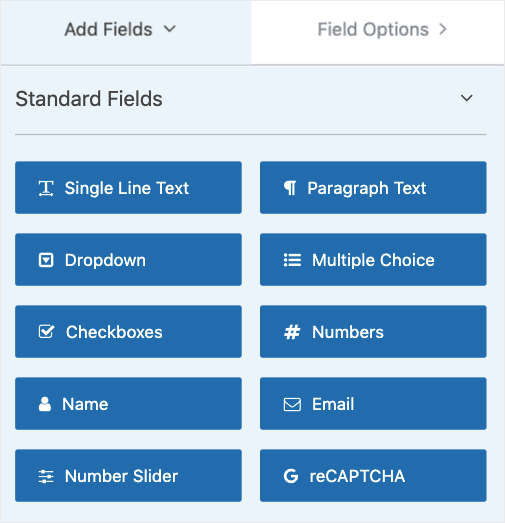
However should you want different fields, you may add them from the choices on the left-hand aspect:
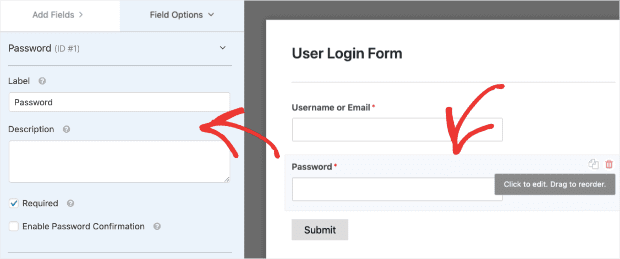
To ensure your login type is helpful, it’s also possible to create an choice to assist present customers get well their forgotten passwords. Equally, you may add a hyperlink for first-time guests to create an account together with your retailer.
To try this, click on on the Password area in your template to carry up the enhancing choices within the left-hand aspect menu:
Within the Description area, enter the next code:
Your Description area ought to now appear to be this:
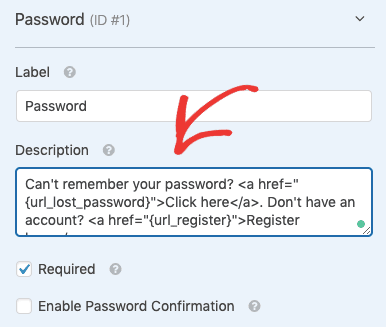
These hyperlinks give customers the choice to get well their forgotten passwords or register for a brand new account:

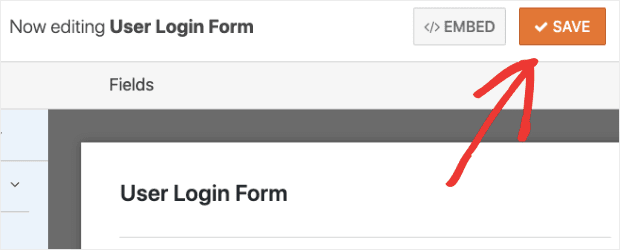
Now we’re virtually finished with WPForms. We simply must hit SAVE within the higher right-hand nook of your WPForms editor:
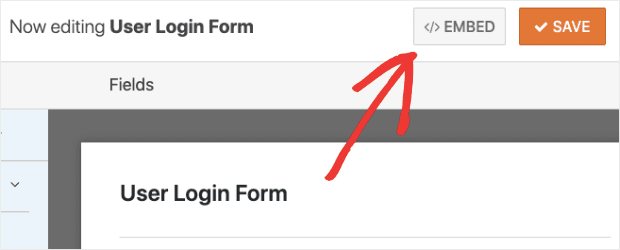
Click on EMBED to get the shortcode for our OptinMonster popup:
You’ll see the next popup. Click on on use a shortcode hyperlink to repeat the shortcode that seems on the backside of the popup:
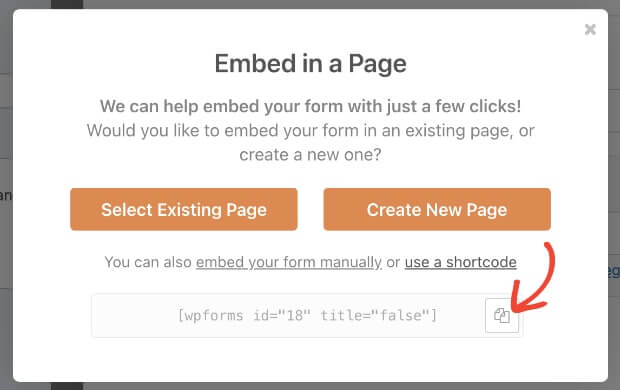
Save the popup shortcode in your note-taking app for later use. You’ll want it if you’re making a customized login web page in WooCommerce with OptinMonster.
Step 2: Create Your WooCommerce Login Popup
To create your WooCommerce type, sign up to your OptinMonster account:

Do not Have an Account?: Get began with OptinMonster immediately, risk-free with our 14-day money-back assure!
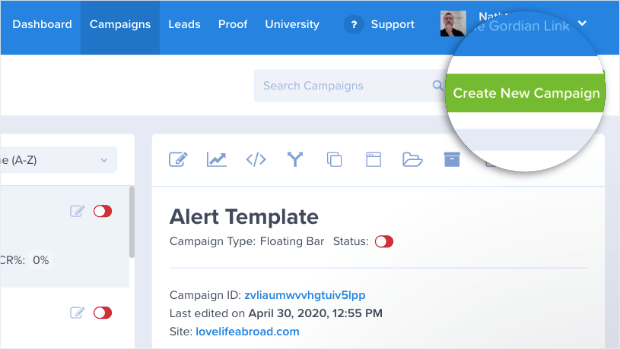
Within the higher right-hand nook of your dashboard, click on Create New Marketing campaign:
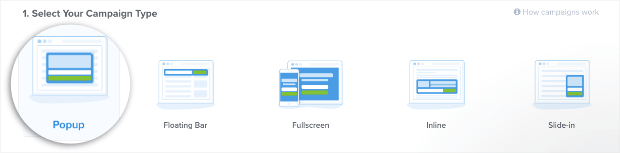
Then select your marketing campaign sort. For our WooCommcer login, we’ll select Popup:
Now it’s time to decide on your template. Because you’ll be embedding a customized shortcode from WPForms, select Canvas:
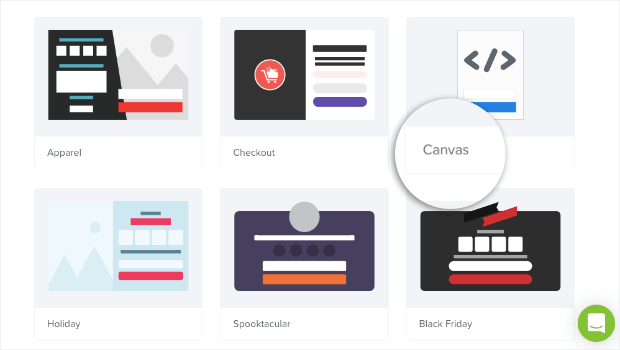
That is our clean template that means that you can begin from scratch.
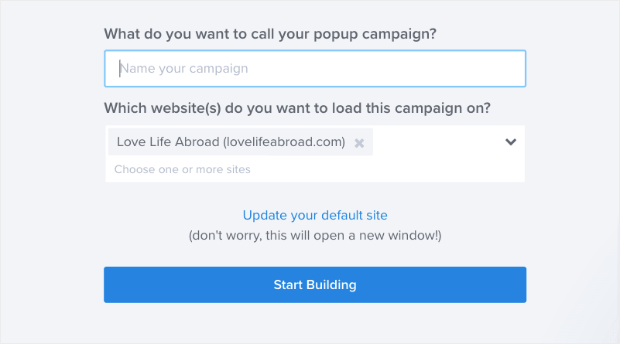
Title your marketing campaign and assign it to your WooCommerce retailer web site:
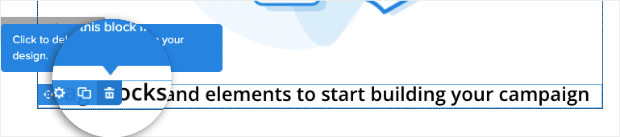
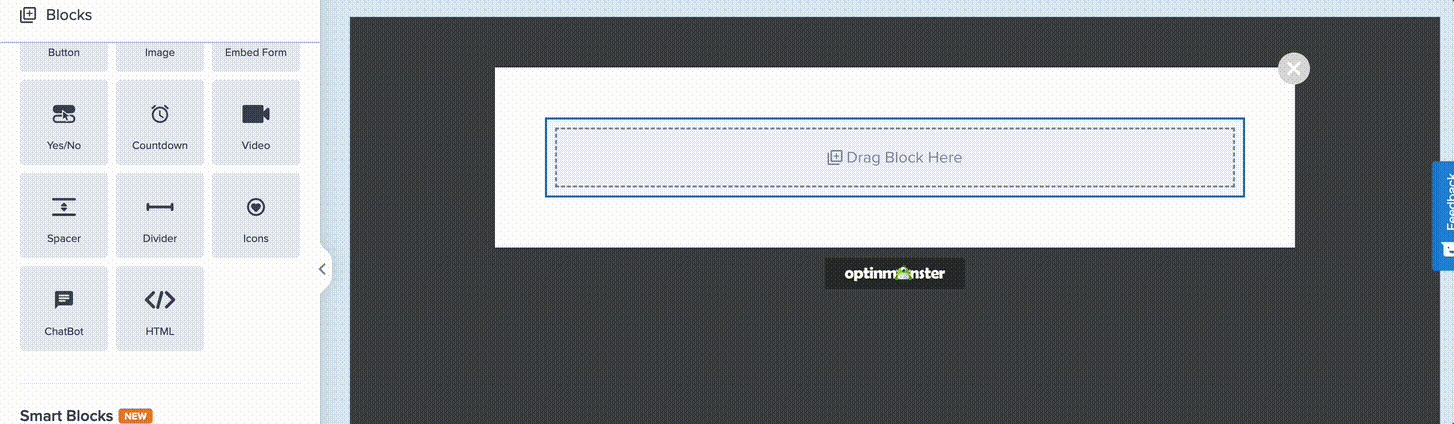
With this, your clean template is able to be personalized within the OptinMonster editor. For this popup, delete the picture that comes with the Canvas template.
Find the garbage can icon on the higher left-hand nook of the picture block and click on delete:
![]()
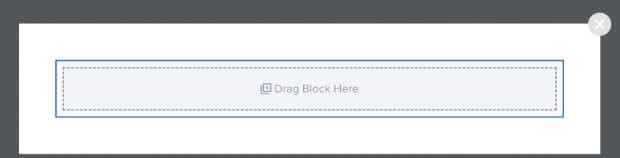
Do the identical to Drag block and parts to start out constructing your marketing campaign:
You now have a totally clean canvas to work from. In your editor, click on on Click on to start out including column blocks:
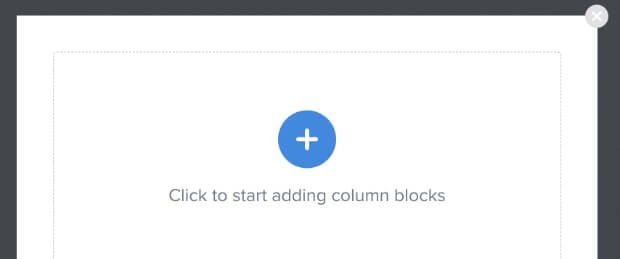
The editor will now appear as if this:
Scroll down on the left-hand menu panel till you see the HTML block:
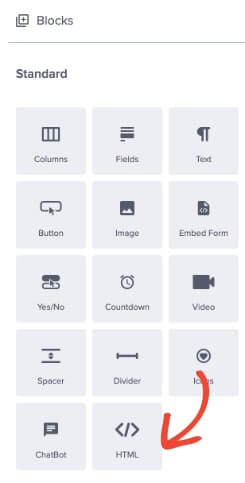
Drag and drop the HTML factor block into your editor:
Within the left-hand aspect menu, insert your shortcode from WPForms within the HTML area block:
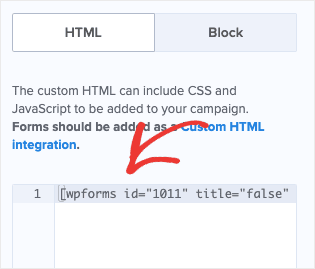
Take into account that your editor will simply present this shortcode at this level. It received’t show the shape fields visually.
The shape will seem as you designed it in WPForms if you publish your marketing campaign stay in your WooCommerce retailer.
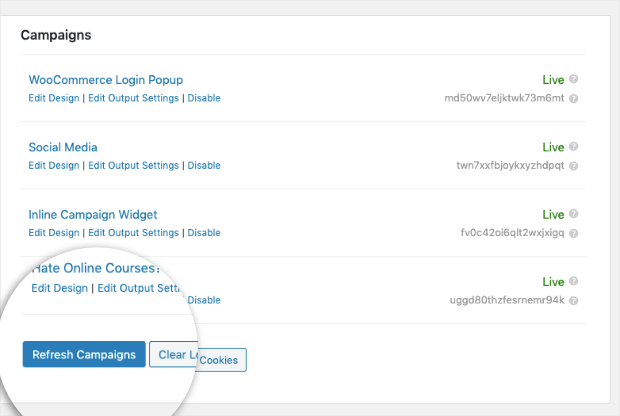
Any time you add or change customized HTML after your marketing campaign has gone stay, keep in mind to go to the OptinMonster plugin via your WordPress dashboard:
Click on Refresh Campaigns on the backside of the web page:
Earlier than going stay, you may additional customise the client login type by including a emblem, pictures, checkbox, or customized textual content.
We received’t get into element on the right way to edit the WooCommerce login marketing campaign on this tutorial. If you wish to find out about customizing your marketing campaign designs in OptinMonster, take a look at our information on the right way to create customized designs.
One factor we are able to’t skip, nonetheless, is including some customized CSS to ensure your login type appears nice!
Step 3: Including CSS to Your Login Type
To make it possible for your WooCommerce login type comes out trying such as you need it, we’re going so as to add a little bit customized CSS to your OptinMonster marketing campaign.
CSS or Cascading Model Sheets is a mode sheet language used to outline the visible look and formatting of HTML parts. It’s a robust software to offer your HTML parts a singular, particular person fashion that matches your model fashion.
If you happen to’ve by no means labored with CSS earlier than, don’t fear! What we’re doing immediately is tremendous simple.
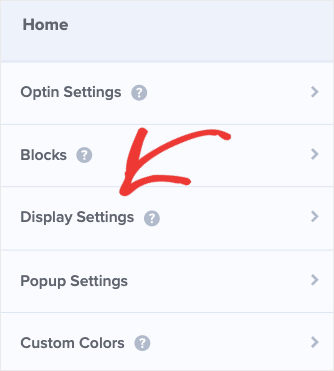
Go to the primary menu in your OptinMonster marketing campaign editor and click on on Show Settings:
Then scroll all the way down to the place you see the sphere field the place you may enter customized CSS:
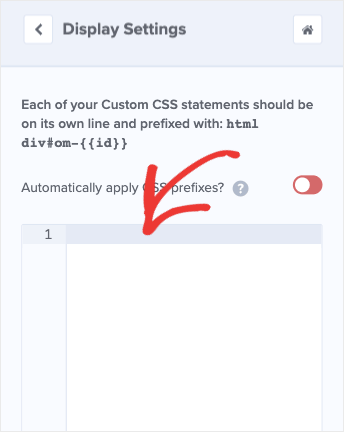
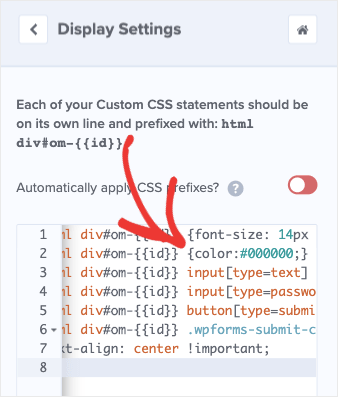
Enter this code within the area field:
It will make your register type look a lot nicer:
When you have expertise utilizing CSS, you may customise the shape even additional. For inexperienced persons, don’t fear about utilizing the superior CSS functionalities. Simply change the textual content measurement and colour within the inline CSS code:
If you happen to don’t wish to make any modifications to it, the default CSS code we’re utilizing on this tutorial will work simply high quality.
And that’s it!
When you’ve configured your login web page in WooCommerce to make it look the way in which you need, hit Save on the high of your OptinMonster editor:

If you happen to’re utilizing the OptinMonster plugin, don’t neglect to refresh your marketing campaign in your WordPress dashboard such as you did earlier:
With this, we’ve reached the final step of making a WooCommerce login web page. This step includes deciding when and the place in your web site you need customers to log in.
Step 4: Set Up Your Login Popup Show Guidelines
Subsequent up, let’s create WooCommerce login popups for the three widespread use instances we mentioned earlier:
- Making a clickable login button.
- Making prospects enroll or log in to finish a checkout.
- Asking prospects to enroll or log in as quickly as they land in your web site.
Let’s have a look at the right way to arrange every and their advantages.
Use Case #1: Making a Clickable Login Button
Putting a WooCommerce customized registration popup on the high navigation menu is among the most typical use instances for eCommerce web sites. This enables customers to click on the login button on the navigation menu or wherever else in your web site and entry their account with ease.
When customers click on the stated hyperlink or button, a separate popup seems, asking them to log in or entry their account. That is simple to arrange and nice for enhancing your customers’ expertise.
OptinMonster makes it simple so that you can provide this login expertise to your web site customers. First, log in to your OptinMonster account.
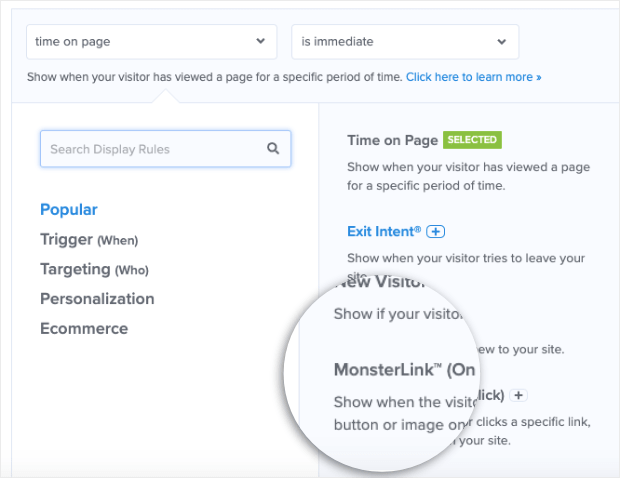
Head over to Show Guidelines on the high of your editor. Yow will discover this on the high of your OptinMonster editor:

Change time on web page to customer clicked a MonsterLink™:
Copy the shareable MonsterLink™ code:

You now have an embeddable hyperlink that you may hyperlink to the login button and insert into your web site’s navigation menu.
By no means made a customized header navigational menu? No worries! Take a look at our tutorial on the right way to add a navigation menu in WordPress.
Use Case #2: Making Prospects Enroll or Log in to Full a Checkout
This state of affairs is helpful if you need prospects to create an account together with your WooCommerce retailer or log in to the location earlier than they will checkout.
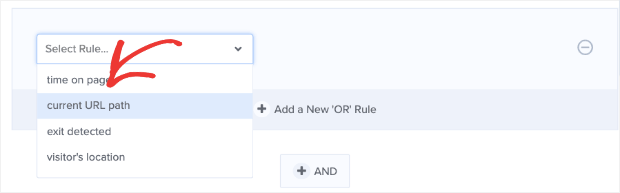
To allow this, go to Show Guidelines of your login popup marketing campaign.
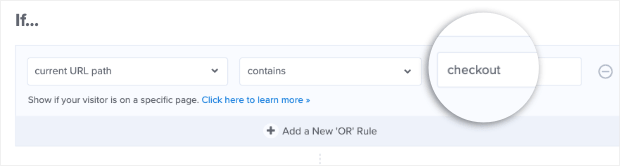
Change the primary situation from time on web page to present URL path:
Within the subsequent dropdown, change is any web page to incorporates:
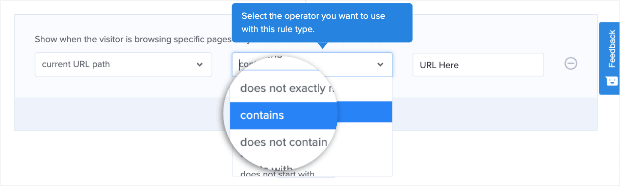
Lastly, within the area field subsequent to that, enter the phrase checkout:
Subsequent up, click on Add a New Rule:
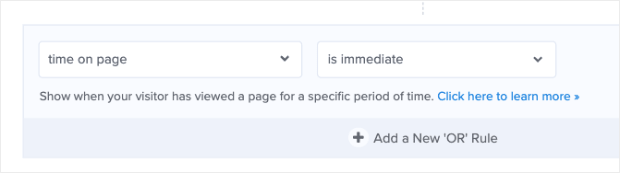
Configure the next situation: time on web page + is speedy:
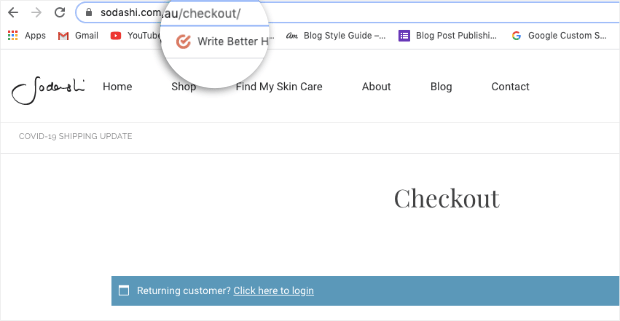
You’re doing this as a result of WooCommerce checkout URLs observe the identical construction. At any time when a purchaser needs to take a look at on a WooCommerce web site, the URL has the next syntax:
www.myonlinestore.com/checkout
The area title will change relying on the WooCommerce retailer. However the URL slug at all times ends in checkout until you customise it. Right here’s an instance:
With the show rule you’ve simply set in your WooCommerce login redirect popup, prospects will see a immediate to log into their account once they navigate to the checkout web page.
This can be a nice strategy to enhance consumer expertise in your web site.
If the customers’ have shopped with you previously, they will view their previous billing and delivery data on the My Account web page. This helps you create a clean checkout expertise in your prospects and scale back procuring cart abandonment.
Use Case #3: Asking Prospects to Enroll or Log in as Quickly as They Land on Your Web site
In some instances, you could wish to give members the choice to log into your WooCommerce product web site once they land in your retailer. With OptinMonster, that is simple to arrange.
Go to Show Guidelines and configure your first situation to appear to be this: present URL path > is any web page.
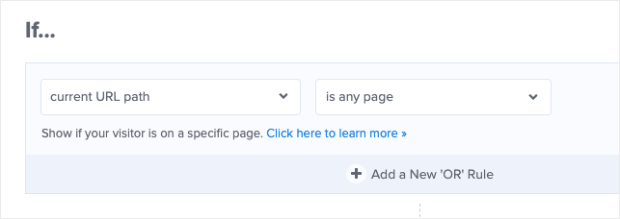
It will show your WooCommerce login popup to everybody who visits your web site. New members can use the hyperlink on the popup to create a brand new account, whereas present members can both log in or get well their passwords.
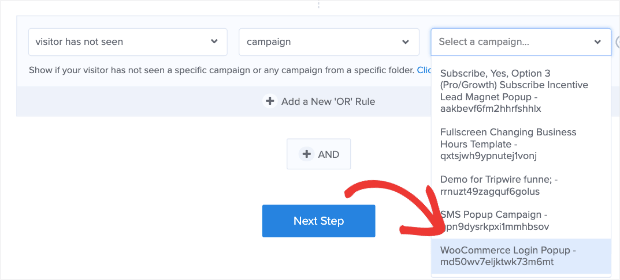
There’s one factor to concentrate on. Customers get irritated if you repeatedly present them the identical popup over and over. To keep away from this, you may set your second situation to customer has not seen and marketing campaign:
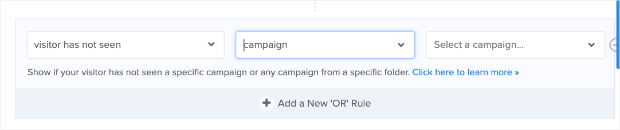
Within the Choose a marketing campaign dropdown field, be sure you select the WooCommerce login popup marketing campaign that you just’re presently engaged on:
Now, your WooCommerce customers will solely see this marketing campaign as soon as.
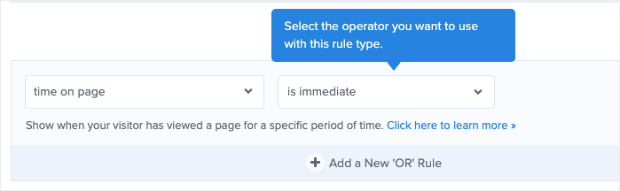
If you wish to assist prospects save time on their checkout journey, create a remaining rule by clicking + AND:

Set your remaining rule to time on web page + is speedy:
Now, customers can log in to your retailer as quickly as they land in your web site. With this, they will add objects to their procuring cart and transfer to checkout with out having to sign up once more.
Plus, all the things strikes sooner when prospects have their billing and delivery data already obtainable to them.
There’s only one other thing to do. Return to Show Guidelines within the navigation bar:
Underneath the rulesets, find and click on on the Completed? Go to Actions button.

Change your Cookie Settings to on their subsequent go to to the location for each customers who’ve transformed and never transformed:
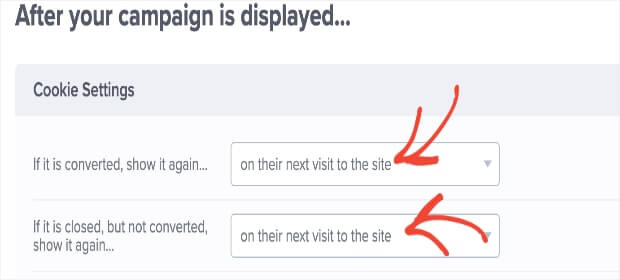
This ensures that your login web page seems every time the identical consumer visits your web site. Due to the show guidelines we set earlier, they received’t see the identical login popup twice throughout the identical session.
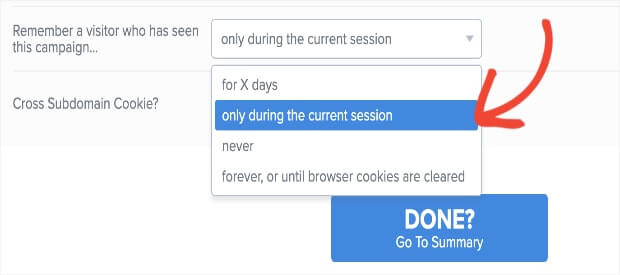
Nevertheless, there’s additionally a 3rd choice within the Cookie Settings: Keep in mind a customer who has seen this marketing campaign. You may select the choice that you just desire from the dropdown. For this tutorial, we’ll go along with solely throughout the present session. This implies anybody who visits the web site will see the marketing campaign once more throughout their subsequent session.
And that’s it! Properly… virtually. Now you simply must publish your marketing campaign.
You now have a WooCommerce login web page that you need to use to reinforce your customers’ expertise and scale back procuring cart abandonment:
Keep in mind, we made a easy WooCommerce login web page instance immediately. You may customise these campaigns to mirror your model’s fashion.
Nevertheless, we solely coated 3 use instances. You should utilize OptinMonster’s Show Guidelines to configure your WooCommerce signup popup to cater to a number of different use instances.
Subsequent, Check Your WooCommerce Login Web page
WooCommerce presents the performance for its retailer homeowners and account admins to log in to their websites and store as a buyer. With this performance, you may take a look at the brand new WooCommerce login web page you simply created.
Let’s see how that works:
Step 1: Log in to your WooCommerce account.
Step 2: Obtain the .zip file out of your WooCommerce account.

When you obtain the plugin, it is going to generate a My Account web page in your retailer. It’s going to additionally generate a WooCommerce login shortcode [woocommerce_my_account].
Step 3: From the WordPress Admin dashboard, go to Plugins > Add New.
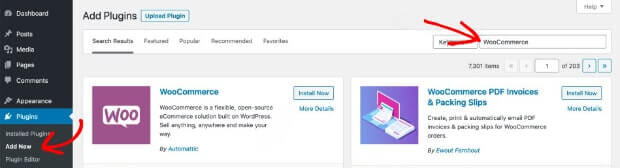
Step 4: Click on Set up Now and Activate the plugin.
Step 5: When you end putting in and activating the plugin, you’ll see a brand new menu merchandise within the WordPress Admin panel: WooCommerce > Settings > Store as Buyer.
Step 5: Examine the Allow plugin settings choice to complete the setup. You may also:
- Allow login as a buyer function
- Allow login historical past file
- Customise swap button textual content
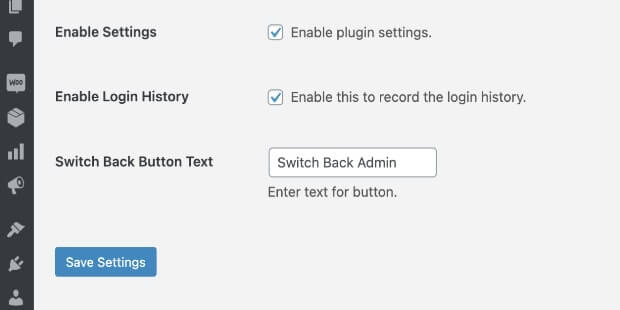
Click on on Save Settings.
Step 6: Log off and log in once more as an admin and go to your retailer’s frontend interface.
You must now see a brand new tab, Change to Buyer, within the admin console proper below your profile image. Click on the choice to point out a popup that can mean you can log in as a buyer.
Now you may take a look at your WooCommerce login web page and make modifications to it for higher buyer expertise!
We hope you loved this text. If you happen to did, you may additionally wish to take a look at the right way to make your popup kinds responsive.
You may additionally be considering studying posts associated to enhancing your WooCommerce retailer’s efficiency:
For extra tutorials on the subject, take a look at our YouTube channel. We’ve acquired a great deal of movies that can educate you to drive visitors, enhance conversions, and improve gross sales. Additionally, observe us on X (previously Twitter) and Fb to remain in contact via social media.
Fascinated about creating greater than only a login web page in WooCommerce? Be a part of OptinMonster immediately to see how we can assist skyrocket your conversions at each flip of your prospects’ journey.
Get Began With OptinMonster Right this moment
Hello, I am a author and content material marketer with 10+ years of expertise. Over time, I’ve helped a number of B2B SaaS manufacturers develop their on-line presence and get extra prospects. At OptinMonster, I write about all issues advertising — starting from how-to guides to the best-of instruments that can assist you enhance your e mail advertising, lead era, and web site conversion campaigns.