
By Dave Stys October 4, 2022
Up your e-mail coding expertise with this step-by-step AMP for Electronic mail tutorial. Create your individual e-mail that lets readers change the colours of a product picture.
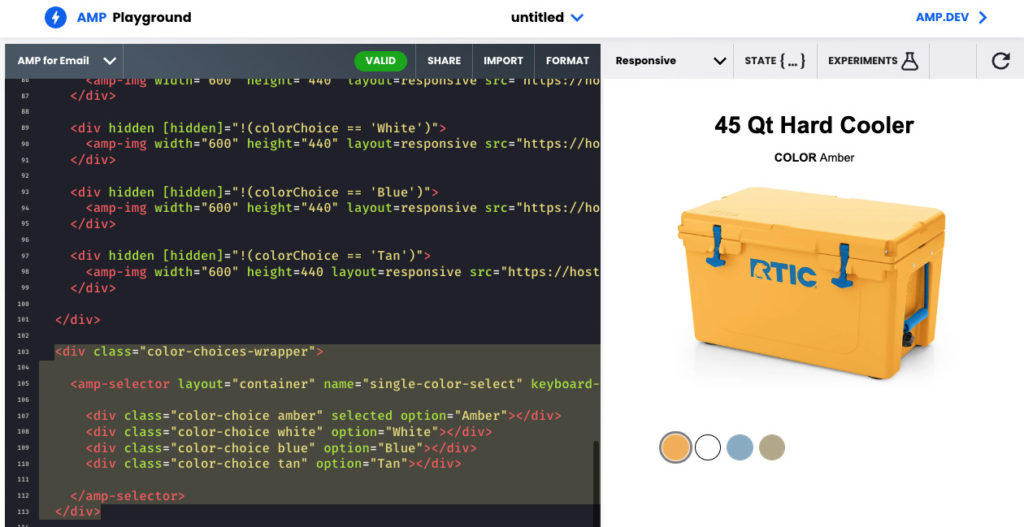
On this this tutorial you’ll learn to create an interactive e-commerce e-mail message. We’ll show a product with a number of coloration choices. The reader will be capable of press every coloration and dynamically replace the product picture. Right here’s what it seems to be like (see the full code instance):
Whereas it’s a comparatively easy instance, you’ll grow to be accustomed to a number of necessary AMP for Electronic mail elements reminiscent of:
- amp-img an AMP alternative for the html5 img tag.
- amp-selector a management for choosing a number of choices
- amp-bind responds to consumer actions reminiscent of hovers, clicks, kind submissions, and so on.
To offer you an thought of what else might be with these elements, right here’s a extra refined instance from Google. This provides the additional complexity of displaying totally different merchandise (the 1-pack, 2-pack, and 3-pack) and lets folks see these merchandise in numerous colours, however the precept of what you’ll be taught under is similar.
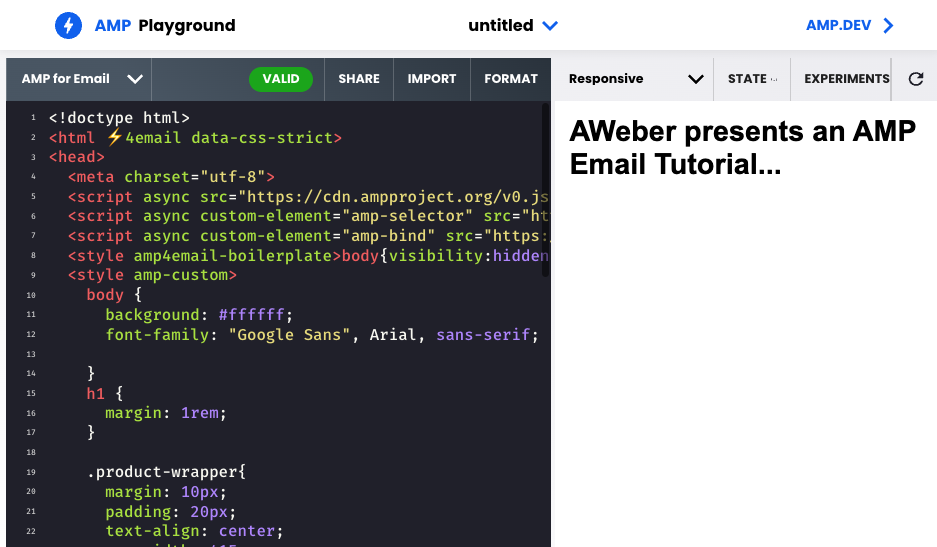
Step 1 – Fast Begin with the AMP Playground
We are going to use the official AMP Playground for this tutorial. I’ve gone forward and included some fundamental CSS for laying out our product picture and the colour selectors so you possibly can concentrate on studying how the AMP elements work.
Go to this tradition AMP Playground for a fast approach to get began.
Step 2 – Add The Product Particulars
Let’s start laying out the message. We’ll begin with the product tile, description (simply coloration on this case), and the product photographs. Add the next contained in the <physique>.
<div class="product-wrapper">
    <h1>45 Qt Onerous Cooler</h1>
    <p><b>COLOR </b><span [text]=colorChoice>Amber</span></p>
</div>
Be aware, we’re utilizing [text]=colorChoice. It is a hook that we are able to use afterward within the tutorial to replace the product description with the chosen coloration. For instance, when the consumer chooses “Blue”, the textual content will dynamically replace from “COLOR Amber” to “COLOR Blue”.
Subsequent let’s add our first product picture. Let’s begin with our default coloration, Amber.
<div [hidden]="!(colorChoice == 'Amber')">
      <amp-img width="600" top="440" structure=responsive src="https://hostedimages-cdn.aweber-static.com/MTM0NjMxNQ==/optimized/4244bcee9ff14adcbaa0807c71f4386e.png"></amp-img>
</div>
The <amp-img> is contained inside a div with somewhat little bit of logic, [hidden]="!(colorChoice == 'Amber') which signifies that the Amber product picture will solely be seen when the consumer selects the Amber coloration.
Subsequent, add the remaining product photographs, one for every coloration. Every of those will initially be hidden, because the Amber coloration would be the default product variation.
<div hidden [hidden]="!(colorChoice == 'White')">
      <amp-img width="600" top="440" structure=responsive src="https://hostedimages-cdn.aweber-static.com/MTM0NjMxNQ==/optimized/d15718d91bf247db90707c06d4f2cc30.png"></amp-img>
</div>

<div hidden [hidden]="!(colorChoice == 'Blue')">
      <amp-img width="600" top="440" structure=responsive src="https://hostedimages-cdn.aweber-static.com/MTM0NjMxNQ==/optimized/20f3386a5df049548a23ef2651fca7ad.png"></amp-img>
</div>

<div hidden [hidden]="!(colorChoice == 'Tan')">
      <amp-img width="600" top=440 structure=responsive src="https://hostedimages-cdn.aweber-static.com/MTM0NjMxNQ==/optimized/1975268637ed42ea9172288f3d90b6b1.png"></amp-img>
</div>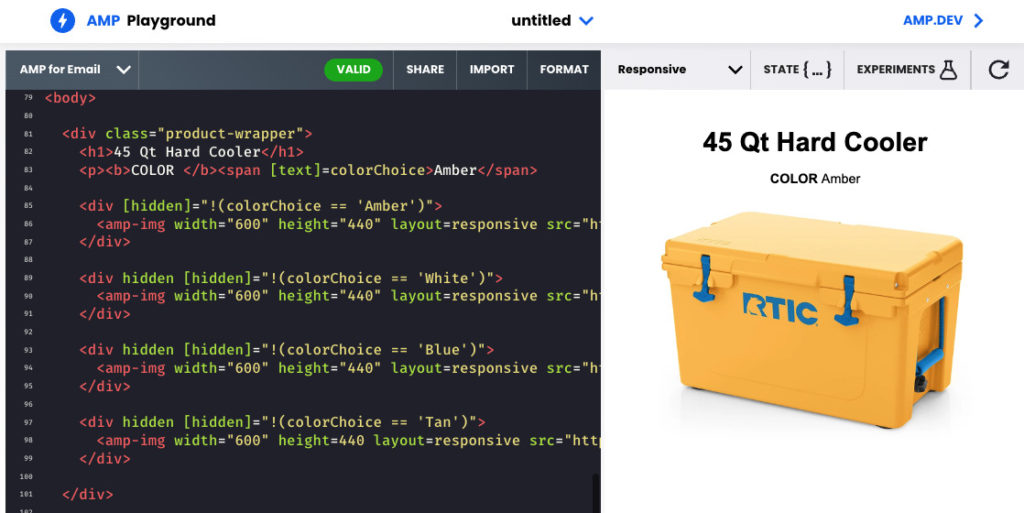
Step 3 – Including the Coloration Selections
It’s lastly time so as to add a selector for every of the colour choices. We’ll use <amp-selector> with the default, single-choice setting in order that they work very like a radio button. And upon choosing a coloration alternative, the amp-state might be up to date to replicate that coloration alternative. The change to amp-state lets the remainder of our doc know to vary the product picture and the colour description. Add the next under the product particulars.
<div class="color-choices-wrapper">

    <amp-selector
        structure="container"
        title="single-color-select"
        keyboard-select-mode="choose"
        on="choose: AMP.setState({colorChoice: occasion.targetOption})" >

        <div class="color-choice amber" chosen possibility="Amber"></div>
        <div class="color-choice white" possibility="White"></div>
        <div class="color-choice blue" possibility="Blue"></div>
        <div class="color-choice tan" possibility="Tan"></div>

    </amp-selector>
  </div>
The <amp-selector> has an occasion set off. When it’s chosen, it updates the colorChoice variable. This variable is used to show the suitable product picture and to replace the colour description textual content within the product particulars.
on="choose: AMP.setState({colorChoice: occasion.targetOption})"
At this level, go forward and take a look at choosing every coloration alternative. It’s best to see your product particulars replace accordingly.
Understanding The way it Works
Here’s a abstract of the fundamental ideas used on this instance.
Coloration Selectors: The colour selector, <amp-selector>, has a “choose” occasion. When the motion happens, it updates the colorChoice variable all through the doc. (<amp-bind> is what associates an motion with a number of updates to the doc.)
on="choose: AMP.setState({colorChoice: occasion.targetOption})"
Product Pictures: The product photographs have fundamental logic to cover or present every picture primarily based on the worth of the colorChoice variable. Instance: hidden = True when colorChoice shouldn’t be equal to ‘Amber’.
[hidden]="!(colorChoice == 'Amber')"Product Description: The product description textual content additionally updates to the worth of the colorChoice variable.
<span [text]=colorChoice>Amber</span>Present us what you created!
Subsequent, I like to recommend sending your self a replica of the message you created from this tutorial. Use an e-mail service supplier that helps AMP for Electronic mail reminiscent of AWeber or use the Gmail AMP Playground.
Should you had been impressed by this put up, I’d like to see what you created! Share within the feedback under or ship me an e-mail and ask me to have a look.